Showing posts with label cage. Show all posts

Saturday, March 10, 2012

We've adopted another lizard

Ryūjin

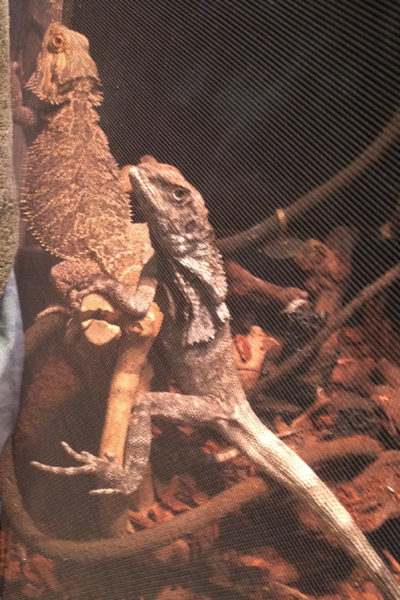
We adopted a new lizard from a local pet store yesterday. This is a female Chinese Water Dragon. We've named her Ryūjin after a sea dragon from Japanese mythology.

From Wikipaedia:

Ryūjin or Ryōjin (龍神 "dragon god"), also known as Ōwatatsumi, was the tutelary deity of the sea in Japanese mythology. This Japanese dragon symbolized the power of the ocean, had a large mouth, and was able to transform into a human shape. Ryūjin lived in Ryūgū-jō, his palace under the sea built out of red and white coral, from where he controlled the tides with magical tide jewels. Sea turtles, fish and jellyfish are often depicted as Ryūjin's servants.

Unfortunately her arm was broken and the pet store took her to a vet several times who put a cast on her arm. She healed up enough for the pet store to send her home but because she was injured they wanted to have her adopted out to someone with experience of taking care of reptiles instead of selling her to someone without experience.

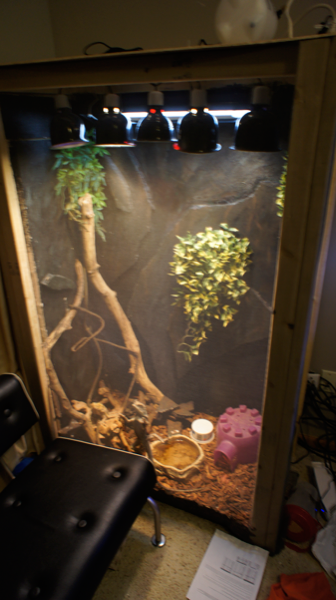
Ryūjin is doing very well. She came home last night and we set up a vivarium with a waterfall for her so she could sit in water (something Chinese Water dragons love doing).


Ryūjin her new vivarium.

For now we're going to keep her in this habitat for a few months to ensure that she can take things easy and let her arm heal (it appears to be mostly healed at this point). Then when she's ready we're going to move her to a much larger vivarium so she can have more room to grow.

Unfortunately broken arms is a somewhat common problem with Chinese Water Dragons, for some reason their arms are very frail. But what they lack in upper arm strength they make up for in intelligence, this creature is smart and observant of her surroundings.

When she was at the pet store they gave her a lot of attention so she is also very socialized.

We'll post more about her later, maybe we'll have to change the name of this blog from Fluffy The Frilled dragon to Fluffy and Friends.

Thursday, March 1, 2012

Heating The Habitat

TroyHoldingFluffy IR000266
An IR Fusion view of Troy holding fluffy.

One of the most important features of a habitat is heat and lighting. When we built our habitat we originally drilled holes in the top of the cage to allow for the ventilation and dissipation of heat. We realized one serious thing, we built a fire hazard!
Fluke Infrared Camera
Fluke Tis Handheld Infrared Camera

After we built the cage we used a Fluke Tis infrared camera to analyze the buildup of heat in the cage. We were lucky that a family friend who works in building inspection has one for his business. Otherwise there are other cheaper IR thermometers you can buy, or just go to the pet store and pick up a thermometer and place it in areas where you want to monitor heat. Checking the temperature buildup is especially important when you're building your cage out of wood. The point at which wood ignites at about 570° F according to some quick internet research. I was more concerned with the adhesive in the plywood igniting, as glue can ignite at 212° F depending on what kind of glue it is. So depending on what kind of plywood you're using if you allow temperatures to reach past 180° F you're risking a fire. Additionally you want the maximum heat in an animal habitat to be no greater than 100° F. Optimum conditions for desert lizards are to have a dry environment with a gradient of heat across the habitat allowing the animal to retreat to a cooler or warmer area if they so desire. Another behavior to watch for is if your lizard is constantly opening their mouths this can indicate that they're trying to cool off. When a lizard is in a hot environment and opens its mouth for no reason it's somewhat analogous to when a dog pants, they're trying to cool down.

As I was saying we analyzed the output of the lights in the cage and were surprised at how warm not only the lamps were but the materials around the lamps were as well. Here are the results from our initial inspection of the lamps with the infrared camera:

Lights Insulation IR000273
An IR Fusion view of the lamps left to right: Night Heat Lamp, Basking Lamp, Red Heat Lamp, Basking Lamp, Night Heat Lamp.

Lamps IR000238
Infrared view images of Lamps showing a range between 80 and 200° F

It's important to note that the infrared camera has a limit to how hot a temperature it can accurately meeter, this camera's limit is about 220° F.

Here is an image of the wood above the lamps showing the extreme heat that was building up underneath the plywood top of the cage:
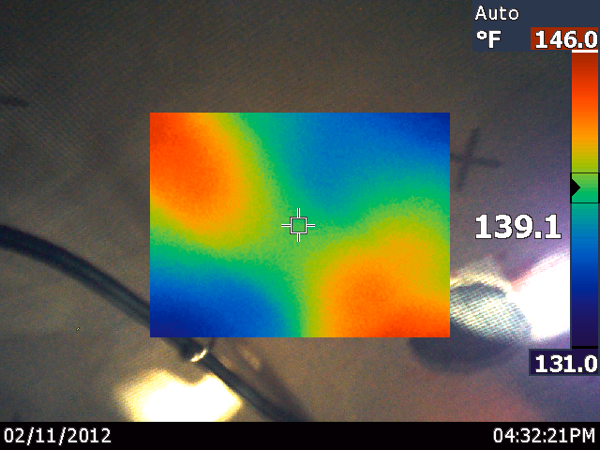
CageRoof PreInsulation IR000259
An IR Fusion view of the ceiling of the cage before adding insulation. Screen material under the ceiling.

Temperatures were nearly exceeding 150° F which was unacceptable for consideration of fire mitigation. We clearly had to do something about the heat that was building up above the lights.

What we did was to add this bubble foil insulation that we cut down to size and stapled to roof of the cage. Any hardware store sells this material, it usually comes in a roll and can be kind of expensive if you only need a small section of material to insulate. But it's worth being able to sleep at night knowing the cage is protected from the buildup of heat.
Bubble foil insulation
Bubble foil insulation available at any hardware store.

Also check the packaging and see what temperature the foil is rated to withstand, in our case the foil could easily withstand up to 225° F.

As you can see below we cut several strips of material and stapled it to the top of the cage:
Lights DSC0410
An view of the ceiling of the cage after adding insulation.

Our lamps are arranged in the following pattern 5 inches below the insulating material: Night Heat Lamp, Basking Lamp, Red Heat Lamp, Basking Lamp, Night Heat Lamp, behind that is a florescent full spectrum lamp.

After installing the insulation we rechecked the buildup of heat with the IR camera both above and below the top of the cage:
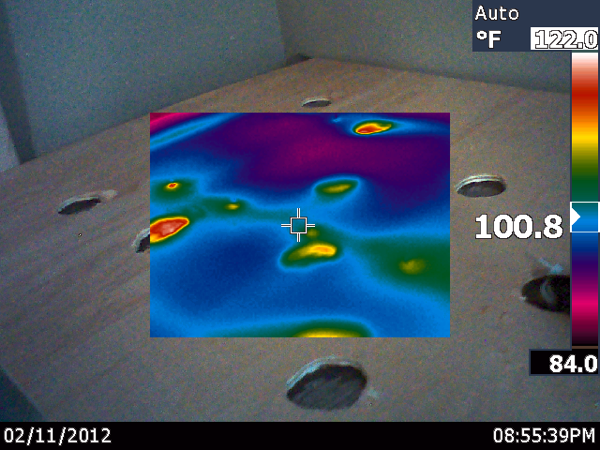
CageTop PostInsulation IR000311
An IR Fusion view of the roof of the cage after adding insulation.

Top of the cage with the IR Fusion Mode to show a the top of the cage was averaging 100° F. 

The red and white hotspots show the heat of the insulation on top of the bubble foil material, exposing the plywood to a max of 122° F. This technique of using this bubble foil material effectively lowered the exposed heat to the plywood by about 30° F. You can note that in the images above this one before this material was added the wood was being exposed to temperatures of about 150° F.
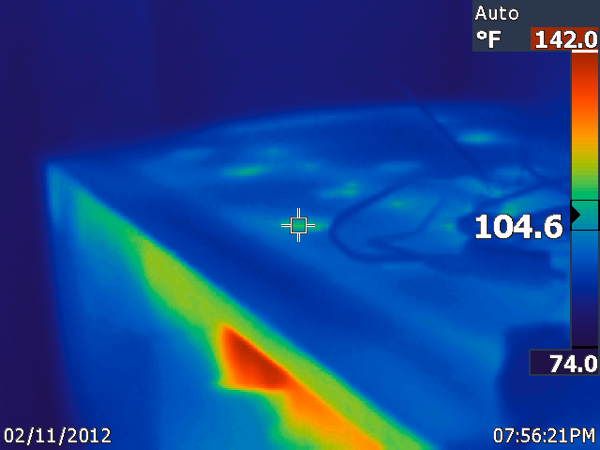
CageTop PostInsulation IR000281
An IR Fusion view of the roof of the cage after adding insulation.

On average the top of the cage is about 90° F, those hotspots are where we originally cut ventilation holes show that the top of the insulation reaches about 110-120° F

CageTop PostInsulation IRFusion IR000309
An IR Fusion view of the top insulating material of the cage.

Above is a view of the bottom of the insulation after the lights have been on a few minutes, the insulation not only reflects light down towards the lizards but does the same with heat as well.
We use the IR camera to inspect how well heat was reaching the bottom of the cage as well as whether or not it was allowing for a gradient of heat to allow the animals to move to different areas of the cage to cool off or warm up.
BackOfCage IR000250
An IR Fusion view of the top of the cage.

We examined the upper area of the habitat and found that it can get up to around 100 degrees which is a good target for a warmer part of the habitat.

We also needed to check and see how the bottom of the cage held the heat as it was about 5 feet from the lamps at the top of the cage and one side of the cage was just a screen material that allowed heat to escape from the front of the cage.

BottomOfCage IR000249
An IR Fusion view of the bottom of the cage.

When we examined the bottom of the cage with the IR camera and we determined from these images that the bottom of the cage can reach about 70 or 80° F. Because the cage is near a window and the temperature in that area can get kind of cold we also learned that shaded parts of the cage and get as low as 50° F (which is too low we added some insulation to fix this).

We also have to consider the fact that the frilled dragon can climb and likes to hang off of branches so the entire cage is accessible to him, unfortunately the bearded dragon does not climb higher than a foot or so off the ground. We had to provide him with another source of heat if he wishes to be warmer. We added a rock heater underneath some of the bedding:
Heatrock
Standard heat rock available at any pet store.

After adding the heater we took this image to show how it improved the heat in an area of the cage:
CageBottom PostRock IR000307
Bottom of Cage Rock Heater underwent substrate.
The rock heater allow the bearded dragon to warm up in an area that is nearly 90° F which is much better for him.

We're continuing to work on this habitat, we're considering ways in with we can provide the bearded dragon more direct access to the basking lamps. Right now we're working on building a series of ramps he can climb to get closer to the lamps. When we make those changes we'll post about them. We considered lowering a basking lamp on a wire from the top of the cage, however we were concerned that fully could try to jump from his branch or from the screen and try to land on the top of a lamp, since those lamp fixtures can reach as high as 250° F we were convened that he could jump on them and burn himself, so rather than take the lamps to the lizards we'll have to engineer a way to bring the lizards to the lamps.

Now fluffy enjoys hanging on his branch or climbing the screen to bask in the heat.

Fluffy IR000240
Fluffy hanging by and basking on his branch.
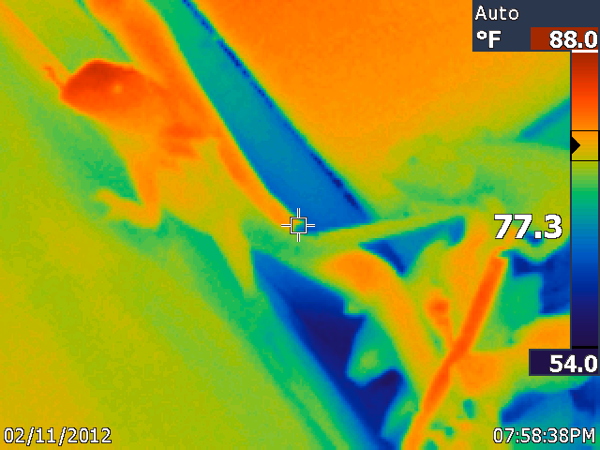
Fluffy PostInsulation IR000285
Fluffy hanging on the screen about a foot above the floor of the cage, beau is behind him in green.

This image shows that fluffy's skin is about 85° F, while Bo the bearded dragon is about 80° F. The infrared cameras as a fascinating way to see how cold blooded animals react to temperature when they choose to bask or cool off.

Saturday, February 25, 2012

Building The New Cage

Fluffy and Bo's New Cage

Completed Cage

Background
Fluffy and Bo previously resided in two separate cages on a baker's rack. Fluffy was in a 50 gallon tank on the top shelf. Bo was in a 40 gallon tank on the lower shelf. This is the third cage he's had since we've had him. When he was small he was in a 30 gallon tank and he was so small it would be hard to find him. As he grew we had to move him to the 50 gallon tank which he then outgrew in about a year and now he's so big that we've build this custom habitat for him and Bo.

Fluffy in his Old Habitat
Photo of Fluffy in his Old Habitat
He's grown quite a bit since this photo was taken.

The tank Bo was in was too narrow for his size as well. If he wanted to turn around he would have to fold his body to be able to do so. For comparison his old tank was about as deep as his pink hiding house that he's pictured on top of in his now home to give and idea for the scale of the difference just in terms of depth from his hold habitat versus his new habitat.
Bo on top of his pink house
Bo on Top of His Pink Hide
His old cage was only as deep as the pink house is wide.

Design Process
Before you construct anything it's a good idea to come up with a solid design. We've looked at several large habitats that you can buy on the internet ranging from $600 on up. We looked at several of these products before we began to plan our design. We knew that we wanted to provide an environment for two animals both of which are semi desert dwellers but Fluffy who happens to live in a semi desert/forest savannah kind of an environment. So we knew that Fluffy would prefer to hang out high and sit on branches while Bo the bearded dragon would prefer to chill out on the floor of the habitat. Bo's physiology requires heat and light. Where fluffy requires water for drinking and bathing and branches to climb and a gradient of hot and cold in his environment so he don't over heat or freeze.

Knowing this we realized that we would need to synthesize an environment that could provide for these requirements.

Our first consideration was size, the main reason for building this new enclosure was to allow both animals a larger habitat to live in, they out grew their old enclosures. We wanted the new enclosure to be large possibly 6 feet tall by 4 feet wide by 2 or 3 feet deep.

Secondly we had to consider logistics and how to practically make a suitable environment that was semi-portable in the event we would have to move some day and for consideration of the fact that we were building the enclosure on our garage and that it would have to be carried up three stories to our bedroom. The key to doing so would be to first make it small enough to fit through doors, up stairs, around corners and light enough so that it could be lifted with a two-wheeler moving cart. This alone informed several decisions we had to make about what kinds of materials to use. We were either going to use wood or metal to build the frame, metal was nice because you can use relatively thin pieces to construct a frame on the down side it's difficult to work with it must be cut and welded and it's more expensive to work with.

So rather than construct the frame of the habitat from metal we decided to use 2 x 3 wood to build the frame. 2 x 3 wood was the smallest wood we could work with, any smaller like 2 x 2 or 1 x 1 and the frame would be too weak to support the weight of the roof of the enclosure, also any smaller than 2 x 3 and the pieces you work with tend to not be straight or to bend in an awkward way.

Another thing we had to decide on what kind of material to use for the front of the habitat. We want to be able to see through inside the habitat. We considered our options glass plexiglass or a screen material. Regular glass would be too dangerous to risk shattering, it's difficult to mount in place and it's extremely heavy and it can be easily scratched. We strongly considered plexiglass, the main reason we didn't go with it was because it's expensive, difficult to cut without cracking, it scratches easy. The advantage to using any kind of glass material is that it insulates the heat in the habitat. When you have a well insulated habitat you can use less heating elements and/or heat lamps in the habitat. We ended up using a screen material. We didn't want to just choose any screen material. I would strongly caution against using any screen material that is composed of metal or wire as most are. We went to Lowe's and they had a screen product specifically for cats who scratch screens, it's more of a plastic or venal material. I would be concerned that if the screen material were metal a bur or a stray wire could scratch or cut the inhabitants. Fluffy enjoys climbing up on the screen and basking near the heating lamps. It's kind of strange to see a lizard floating in mid air, that's what it looks like sometimes. He's not light and his claws are sharp, the screen material that we used is a good product it supports his weight and it has yet to break under his weight.

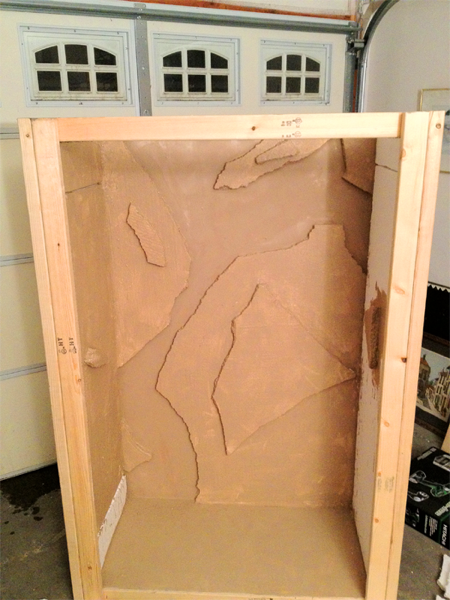
Another thing that we wanted to do was to have the walls simulate rock. Because the walls were made up of plywood we ended up buying large sheets of styrofoam cut them to size, glued them to the walls, covered them with a thin layer of grout to add texture, several layers of non-toxic acrylic paint to simulate depth and the color of rock and a non-toxic sealant like moge poge. The foam has an added benefit of providing insulation for the heat lamps to keep the habitat warm.

Construction Process
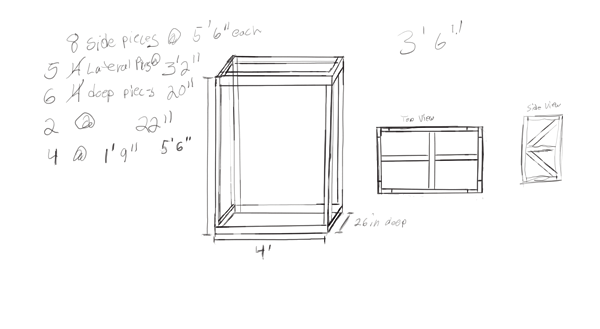
As I was saying before beginning construction you must do research to formulate a concrete design. My partner has a little experience with woodworking so he did the rough design and built the cage for me. This is the sketch he made in preparation for getting the wood and in preparation for construction.
Reptile Cage Design Sketch

Our Initial Sketch for the Frame

By sketching out this design it helped to calculate how many 2 x 3 inch pieces of wood we needed, they came in 8 foot lengths.

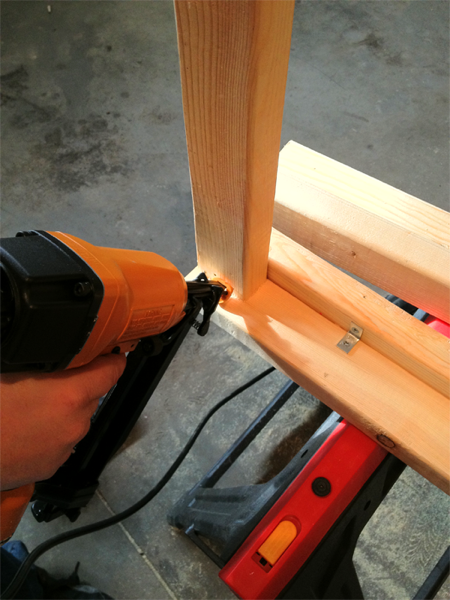
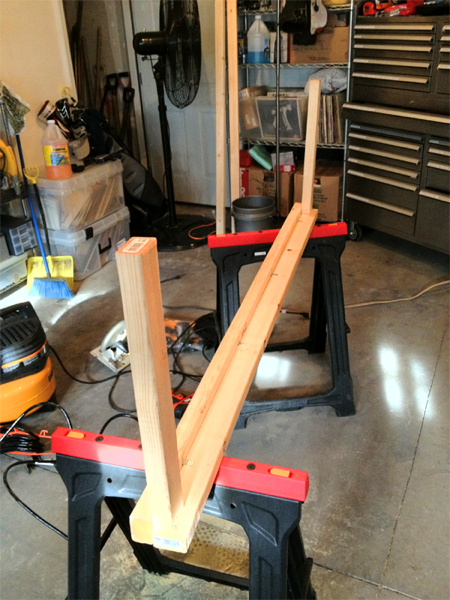
Once we went to Lowe's and bought the materials he took them home and in the garage he cut the lengths for the frame and tacked them together with his air nailer.
Construction Step 1 Cut Wood to Length and Tack it Together
Construction Step 1 Cut Wood to Length and Tack it Together, Clamps Help a lot!

Construction Step 2 Reinforce the Joints with Some Kind of Struts
Construction Step 2 Reinforce the Joints with Struts, tack the pieces together with nails

Construction Step 3 Attach Cross Braces

4
Use an air nailer, it speeds up the process tremendously and gives a nice clean look to the final product

5

6
Construction Step 5 Join Sides Together

8
Construction Step 6 Reinforce the Joints with Metal Struts

9
Now the Frame is Put Together with the reinforcing struts it's very strong too.

10
Roughly Assembled

I've omitted a few steps in between. But this is assembled with plywood on the bottom and sides and another layer of inch and a half thick layer of insulating foam and grout. The foam is layered to look like several layers of slate. There are also doors cut on either sides with a long hinge to allow access to the inside of the cage from either side of the cage. Once the screen is on the front of this you will not be able to access the inside of the cage unless you have doors.
Finishing Processes
11
You have to prime the surface with a white or black color then we experimented with adding highlights and shadows to give texture to the rocks.

12
This is with more of the highlighting done and some of the layers of paint coming together, there are a lot of hues of blues and greens to bring out the texture.
13
Finally it's important to apply a layer of sealant. We used moge poge, which looks very glossy when it goes on but after it dries it's very matte.

This is what the final product looks like with the top, lights, screen bedding and props in place:
CagePort DSC0409

The final thing was light enough for my partner to get it upstairs on a two wheeler.

Monday, February 13, 2012

Update…Cohabitation

First sorry that we haven't updated the blog in quite some time, things have been busy since our last posts, we've moved, one of our lizards (Bo the bearded dragon) that was being fostered with a friend since our house burnt down has came back home to us.

We've moved out of the hotel in which we were temporarily living and both lizards have came back to live with us. Previously both Fluffy (the Frilled Dragon) and Bo (the Bearded Dragon) were housed sepiratly each in their own 50 gallon tank on a wire baker's rack. We've taken the time to put together their own habitat so they can have a larger place to live, together.


Cohabitation of a Bearded and Frilled Dragon

FluffyAndBo

I realize that there are a lot of people say that it's not a good idea to house heterogeneous species of lizards together and that lizards should only cohabitate if they're of the same species and mixed genders or are exclusively juveniles. In our case Bo is an 8 year old bearded dragon, Fluffy is almost two years old, he's growing out of his juvenile lizard phase. In most cases one should worry about the bearded dragon being hostile towards other lizards because their venomous and can have an aggressive attitude. Other concerns is providing an environment that is suitable to house two species. A desert animal should never be housed with a rainforest animal because it is impossible to create an environment that provides suitable humidity, a humid environment will kill a desert creature by way of respiratory infection, a dry environment will kill a rain forest creature through lack of proper hydration. Additionally different animals have different kinds of bacteria. An iguana's bacteria can kill a bearded dragon just from transmitting bacteria.

In our case we felt comfortable with both our lizards cohabitating because of analyzing the following factors:

Habitat

Frilled dragons and bearded dragons come from the same habitat more or less. They both come from Australia/New Zealand in the outback which is kind of a desert/forest kind of habitat and therefore can live in a blended desert/forest environment. The frilled dragon is more suited to climbing trees and anything else they can get their hooks into. While the bearded dragon prefers to bask and chill out near the floor or proper against a rock or branch. When Fluffy was a juvenile there was a lot of misinformation in pet stores on the internet regarding humidity requirements, a lot of people insisted that they required a lot of humidity, others with experience raising frilled dragons will say that humidity is less of a concern and too much can can cause respiratory problems. We were very careful to provide a moderate level of humidity, the only thing it helps is when he sheds. When his body is wetter he doesn't seem to be as irritated when shedding. For a long time we used a mister to create a gradient of high/low humidity in his cage 40% humidity in the high end. At that time we rationalized that his natural environment was more of a forest environment with higher humidity. In hind sight it was completely un-necessary, the only thing that helped him was having flowing water from a waterfall to drink on occasion, and a large bowl of water "the lizard jacuzzi" to soak in on occasion and wet his skin when shedding. Otherwise misting or adding humidity was completely un-necessary.

Biocompatibility

Another concern is disease and bacteria. I'm not an expert on biology but I read elsewhere that in the case of housing Bearded Dragons and Iguanas was a really bad idea because Iguanas carry bacteria that is fatal to bearded dragons. In our case because fluffy and bo are from similar classes in the animal kingdom and similar habitats, the risk of disease from cohabitation was negligible and a risk worth taking. We felt that it was inhumane to house these creatures in separate smaller habitats and that allowing them to live in a larger habitat with little risk of disease was a risk worth taking. So far it has paid off, both animals are at greater eases and likely from having a larger habitat dispute the fact that they share it with each other.

Temperament

Both dragons get along (a year or so ago they did not but now they don't mind each other), the bearded dragon has a very calm temperament, over the years we have hand fed him, he has interacted with our other animals, cats & dogs, nothing scares him, nothing seems makes him aggressive not even other reptiles. On the other hand the frilled dragon has always been a bit more feisty, but his temperament has changed significantly in the course of a year or so. He's now more docile, he isn't territorial as he was. Previously he was a bit more aggressive in his 50 gallon tank on account of having a small habitat. Now that both animals have a larger habitat they're both more content to enjoy basking, hunting for crickets and even playing to an extent. Fluffy the frilled dragon has not shown any aggressive behavior other than on limited occasion jumping on or crawling over the bo the bearded dragon when moving around the cage.

Also for the most part because the cage is so large both lizards have their own areas of the habitat they live in. The frilled dragon who's species is adept to climbing enjoys hanging off of logs and screen material towards the top of the cage. While the bearded dragon hangs out either in his pink hide house, on his basking rocks, or on top of his pink hide house at the bottom of the cage. He's a bit older and he doesn't attempt to climb to the top of the cage. He could he he wanted to but chooses not to.


Final Word

When considering whether or not to allow two lizards to cohabitate it's very important that you consider the health of both animals before doing anything. I'm the kind of pet caretaker that is very attune to my animals. Additionally I did a lot of research to determine whether or not this was appropriate to house my animals together and considered a variety of factors and risks before entertaining such an idea. Finally I tailored the construction of the cage to cater to the needs of both animals before allowing the two to live together. This worked in my case but if you're looking to do the same thing I strongly suggest consulting a vet, doing a lot of research and not to rush in to such an endeavor and closely monitor the health and wellbeing of both animals before and after doing this. I have and was successful in my case.

Soon to come...

Store bought animal habitats are often just overpriced crap, we know this from years of experience. We will post later regarding the design and construction of our lizard habitat and share photos and information that can help you design and build your own lizard habitat.

Fluffy's Home is Under Construction

Recently we've built a new home for Fluffy, he now lives in his new cage with our bearded dragon, Bo. We are working hard on getting the fluffy cam back online since his home went under construction and we will be adding a blog about his move from his previous 50 gallon cage to his new large custom built home.

Sunday, May 8, 2011

Fluffy got a new home!

If you have been watching the web cam you may have noticed that fluffy got a new home. How fast he has grown. not even a years and two feet already. He did out grow his starter tank. at this rate i will have to start, building by the end of this summer.  As you may have noticed that he enjoys his new log that came with his new home, right by the camera.
Fluffy has been a little pissy. He did finish his shedding a day after his move. Fluffy is always pissy when he sheds but add the stress of moving. I'm giving him a couple of days, before I handle him. I want him to get to know his new home. He does enjoy his home a lot more.


Today I took a picture of him and his frill. I'm going to post it along with the picture of when i first got him, and tell me what you think.


Friday, January 7, 2011

Frilled dragon care info

Because information on the internet seems sparse in regards to Frilled Dragons, I'm going to post what I believe is correct for maintaining one of these creatures in an indoor enclosure. I'm in Iowa where it's dry and cold in the winter and warm and humid in the summer. Keep in mind where you're located because when the humidity changes in your area it's important to adjust your Frilly's humidity and temperature to keep it comfortable for him or her.


Temperature & Humidity
Temp. 100 degree F, in the basking side of the enclosure.  70-80 degrees on the cool side.  Humidity 50- 70%. It's important to have a large gradient (warm air in one part of the cage room temperature in another) It's also important to have a gradient in regards to humidity, the lower end of the thank can be more humid and the top of the thank can be dry.

Your Frilly will pick a spot to sit based on where it's most comfortable to him or her. These animals live in trees where it's natural to have temperature and humidity gradients. They're also similar to bearded dragons which live in deserts so it's important to have dry humid air. Because there is a lot of information out there on temperature and humidity and there are no authoritative resources regarding caring for these creatures we believe that it's best to setup a habitat that offers different areas for all climates and humidities. But keep in mind that your Frilly will also hang out where he or she tends to feel the most secure, as loving as they seem they become scared and frightened very easy. For that reason we have wrapped the back and side of his cage with black paper to make him feel more secure. We have also placed faux vegetation in front of his cage to allow him to hide which makes him more comfortable and secure.

In talking with many people who have kept Frillies as pets the common problem for mortality in juvenile frilled dragons is respiratory infection. Many believe that this is cause by excess humidity. We've seen authoritative resources state that these animals are from jungles and forests where there is a moderate uniform level of humidity towards the floor of the echo system. Unfortunately in a tank it's very hard to reproduce that environment because it's a very small echo system, we try to deal with this by minimizing the fog and humidity and we augment the humidity with water falls and standing water under infrared  light. This causes a more diffused and natural humidity. The problems with humidifiers from pet stores and the spray bottle method is that it introduces larger droplets in the air. This problem will cause respiratory infections get in to the tiny lungs of these creatures and cause infection. That's why we avoid misting, only use a humidifier or fogger on it's lowest setting and use heating lamps to evaporate water. This will end up with smaller particles of water in the air and will help avoid death from respiratory failure caused by excessive fogging or spraying while maintaining an acceptable level of water particle density that isn't harmful to the frilly.

Heating & Equipment
I use two day heat lamps during the day and a night heat lap on 24/7. I also have two full spectrum lights and a black light that i run at night for a cool night light for fluffy it doesn't seem to bother him. So it working and it aids in the web cam. I will post a video of the lighting and the set up at a later date.
Diet
Im having the best luck with the crickets, I also put Healthy Herp Veggie Mix Instant Meal reptile food. it beats cutting fresh veggies up every day Fluffy has not o my knowledge eat any yet but the cricket have and it keeps them alive so it is worth the $20. Other food you can try are wax worms in small doses,cause of the fat content. as the get older you can try baby mice and rats even pinkies. For veggies you can try collard greens,red leaf lettuce, mustard greens, turnips greens, dandelions greens. stay away from spinach, cabbage, large amounts of kale. You can also try carrots, squash, sweet potatoes, peas, corn, and fruits in small doses. Keep in mind not all frilled dragons will eat veggies!!!
when feeding your frilly crickets dust them with a calcium d3 dust you can get that at any pet store. when you feed crickets gutload them. Don't feed them insects from outside cause of pesticides that they may carry. they may kill you frilly!!!!
Substrate & Water Needs
I use a waterfall and I have a water dish for him to soak in, he does drink out of the water fall i find that neat. Substrate can be news paper, wheat brand, and cyprus mulch or soil. once again keep in mind of chemicals. will be dangerous and deadly to your frilly.
Lighting & UVB
Brighter the better. Full spectrum UV source are the best for your frilled. that is why i have two of these bulbs. if the weather is at idea temp &humidity you can let them out to play let them get the real thing it truly is the best.
Sexing & Characteristics
Ok this is not easy to do. as a rule of thumb. Male are larger and and have more color. frills are also larger, and males are less skittish.
Cleaning & and Maintenance
I clean fluffy cage once a week and deep clean once a month, water every day. When you first get your frilly take him to the vet don't just take your pet store a ok on his health. I found that out the hard way!!!


Tomorrow i will try to find out behavior and personality on the frilled dragons!

Monday, December 20, 2010

Weekly cleaning

Tonight I took out everything and wash them, and sifted the sand. I Think I will be using distilled water for here on out the water spots on the side of the tank are a pain to clean. I even took his waterfall out to be cleaned. I did add a black light for a cool night effect. It makes his sand glow green. I enjoy it and he seems to sleep without it bothering him, so I think it is all good. I'm still trying to get him to eat veggies. That is not going well, but I'll keep trying. The only thing I found that he will eat is crickets, and that is funny he is clumsy and his aim is off so he will miss when he goes after them. That is why I enjoy him so much. He is kinda like me, clumsy.

I did find a vet in Des Moines that has dealt with frilled dragons. I'm going to be making an appointment with oaks vet clinic. we'll see how they do...

Monday, December 13, 2010

Fluffy pictures, and Vet visit...

After visiting with a reptile vet, Kevin L. Sanders, DVM, I made a few finishing touches to Fluffy's home. Here are some pictures. He seems to really enjoy it!!! That is good to see. He is good! He is eating again and he is active once again.

The vet did not have a lot to tell me because this was his first encounter with a frilled dragon. What he did say is that Fluffy is about two months old and is under weight. The vet also said that humidity should be at 50 to 60%, and should never get over 75%.

I also emailed a zoo in Australia to see if they would be kind enough to share any information that would be helpful in regards to housing a frilled dragon. I hope to hear something from them soon. I'm also going to try to call the San Diego Zoo, along with the Bronx Zoo to see if they can help me.

Here are some pics of Fluffy's new habitat: